No Picture, though I will DEFINITELY be making these again, very, very soon!
I started with Claussen Dill Halves, my pickle of choice. I sliced the halves up into 1/4 inch slices. I used a tempura batter mix and dipped the slices in that, then rolled in panko bread crumbs. I did a few plain, then added seasoned salt to the panko so the rest were flavored.
I used a pan with vegetable oil to pan-fry the slices, a few at a time. I fried until golden brown and flipped so the other side of the slice would match.
I drained on a paper towel on my plate, and dipped in Frank's Red Hot.
DELICIOUS. Crispy, salty, tangy. I would probably cut my slices thicker next time, 1/2 inch or more. My tempura batter could also have been a little thicker.
I'm vegan and often get the question: What do you eat? Hopefully this blog can answer that.
My goal is to show that being vegan is possible and can be inexpensive. It can also be really expensive - just like any person's dietary preference/needs. I also really enjoy showcasing both chain and independent restaurants with vegan options as well as products that are vegan.
Sunday, October 31, 2010
Saturday, October 23, 2010
Product Review: Tofurky Pepperoni Pizza

Last night, I tried one of three frozen vegan pizzas offered by Tofurky, powered by Daiya. The pepperoni is in the Totino's Party Pizza style that I remember growing up: diced up pieces of pepperoni. The crust is thin and crisps easily. The cheese: not nearly enough -- we added some of our own Daiya cheddar to the pizza.
The other two varieties offered are Cheese and Sausage. I am really interested in getting a cheese and adding my own "meat" toppings, such as the regular pepperoni slices from Yves or some Gimme Lean sausage.
It's expensive (I believe $8.99 USD at my local Whole Foods) for a frozen pizza, BUT given that a mock duck/rinotta (or soy cheese - Follow Your Heart brand) medium pizza costs $16-17 USD to get delivered, it's comparable and still really tasty. I mean, we're coming along when I can go buy a frozen vegan pizza at a store not 50+ miles or mail ordered to me.
Friday, October 22, 2010
Product Review: Ian's Mac and NO Cheese (GF)

So I'll start my renewed commitment to the food blog with a product review. Ian's Mac and NO Cheese which is also gluten free. It uses nutritional yeast for the cheesy base, so it is a lot different than Amy's Mac and Cheese with Daiya. I like it, though.
I use a microwave to make this stuff, and the directions are: poke holes in plastic, then micro for 2min on high, then remove overwrap, stir, micro one more min, and let stand. After the first 2 minutes, during the first stir, this stuff is REALLY questionable: it's runny, the pasta is not done, and does not resemble any mac and cheese I know. Do not give up! After the next minute in the micro, the sauce thickens and the pasta becomes more al dente.
This stuff alone is not bad, but I have been really enjoying it with mixed vegetables and sliced veggie dogs along with some ketchup and hot sauce. Definitely not for everyone, but worth a try.
Hello, World! I'm Not Dead.
Five months. FIVE months since the last post?!?! I have to stop this nonsense. There are perfectly good reasons for this.
1. My camera broke, so I got a new one. I don't really like the new one.
2. I need to renew my Flickr account. (Plan to do in the next couple of weeks.)
3. Need to cook even more! I've been eating plenty, just not very *blog-worthy* stuff.
Never fear, I do not plan on abandoning this project/documentation. I like to see how I've evolved both as a cook and as a photographer. Plus, it helps to keep me creative if I know I have an "audience" to present to -- no matter how big or small. There will be updates -- hopefully LOTS -- very soon.
Sunday, May 16, 2010
Spicy Tofu Triangles
Roasted Beets with Beet Greens
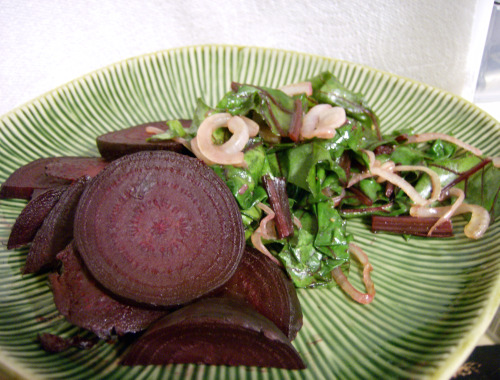
Simple, nutritious, and delicious!
I roasted the beets by wrapping them in foil and baking until soft. Wash beets gently so you don't break the skin -- this keeps nutrients inside and the juices which stain everything sealed inside. Slice up after they are roasted/cooked.
I chopped up the greens and sauteed with onions and garlic and served immediately. I added a splash of white vinegar to the greens as well as salt.
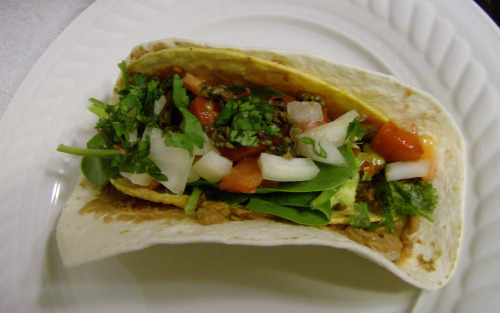
Soft Tacos
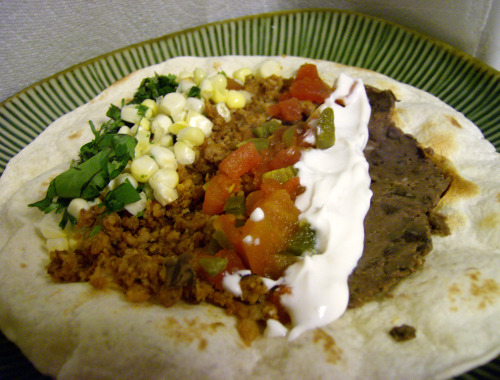
Here's my attempt to make tacos photogenic. Atop a lightly toasted flour tortilla: taco-seasoned TVP, refried black beans with garlic, fresh sweet corn with lime juice and cilantro, rotel tomatoes with habaneros, chopped cilantro, Tofutti sour cream. I added fresh spinach and taco sauce before folding up as a taco and eating.
I know I said that the next taco night I'd make my own tortillas. I still plan on making my own, I just need to get a cast iron pan first. I know I can do it without one, but I'd like to get one anyway and this seems like the perfect excuse.
Loaded Potato Skins
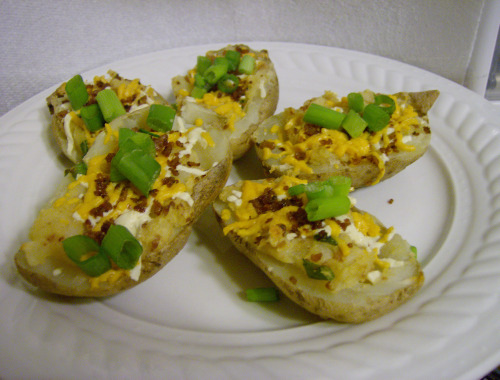
Wow. These were a lot of fun to make and even more fun to eat.
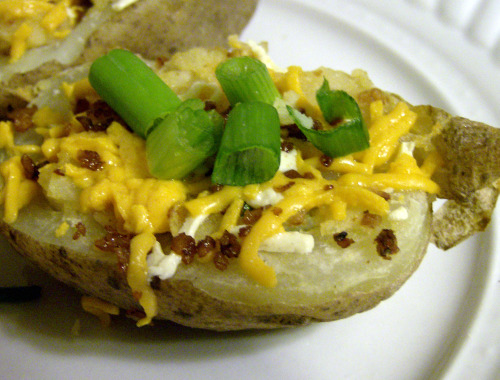
I took about 6-7 russets and baked them in the oven until soft, about an hour. I let them cool down until I could easily handle them, and sliced each on in half. I scooped out the insides and set aside in a bowl. I wound up adding Tofutti sour cream, daiya cheddar and daiya mozzarella to the insides along with some butter and homemade bac-os, stirred it all up and scooped it back inside the potatoes. I baked a while longer, added a mix of cheddar and mozz daiya to the tops of the potatoes along with the rest of the bac-os and broiled until the cheese melted. I sprinkled green onions on the tops and devoured.
Here's a close-up of the potatoes:
Amy's Rice Mac and Cheeze
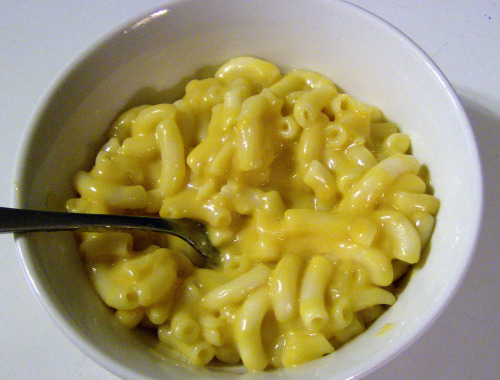
I already reviewed this in my previous post. Here's photo proof of the deliciousness. It's truly creamy, unlike any vegan mac and cheese I've had before.
Yum yum yum. Overpriced? absolutely. Worth it for the delicious convenience.
Sunday, May 9, 2010
Homemade Bacon Bits
For the potato skins I made, I figured that they needed bacon bits. I've heard that Bac-Os(TM) are vegan (obviously check the ingredients as they can change and vary region to region), however I didn't really want to buy some. Instead, I decided to try my hand at making my own.
I bought some TVP, which I've used before in many dishes. I purchased it recently so I can give Taco Night another go.
I've made homemade tofu bacon before, so I just used those ingredients and applied them here.
I rehydrated 1/4c of TVP granules in about 1/4c of boiling water. Then I heated a pan up and poured about 1tsp of vegetable oil in it. I let the pan get very hot, then added the hydrated TVP.
Separately, I mixed together about 1/8c of soy sauce (use Kikkoman or better, no La Choy please!) with 1tsp of liquid smoke and a couple drops of Bragg's Liquid Aminos.
As the TVP fried up, I added the sauce mixture and continued to fry it until it crisped up a bit. Presto! Now you have some "bacon" bits to add to baked potatoes, salads, or any other dish you can come up with.
Saturday, May 8, 2010
New Product Reviews: Daiya Cheese, Amy's Mac & Cheese, Rice Cheese Blocks,
So, this is a no-photo post. There is a very good reason for this.
I have found the best vegan cheese ever, and most (all?) of the dishes have resulted in not blog-worthy photos. What is this mysterious "cheese"? Daiya.
Seriously, check out that link. Gluten, soy, dairy free. Yet...delicious. It comes pre-shredded, in mozzarella and cheddar flavors. (At least at my local Saint Paul, MN, Whole Foods.) My chief complaint is that the package is not resealable and forces me to either dump the contents into another zip-top bag or to utilize my chip clips. (There are roughly 3 individuals who are laughing at my chip clips because they know exactly where they are from.)
Mr. Coconut and I have made several quesadillas and added the cheese to various burritos and pasta dishes. Not to mention just dipping the quesadilla slices in spicy taco sauce, awesome salsa and other dips. Yum! Other dishes in the past two weeks that added Daiya cheese: red potato hashbrowns with Daiya; red potatoes thinly sliced with garlic and onion and olive oil -- plus cheese at the end. I know, a bit potato-heavy, but other than quesadillas and potatoes and pasta, the Daiya cheese ran out quickly.
On that note, I also tried the Amy's Non-Dairy Rice Mac & Cheeze. Amy's previously had a "soy cheeze" mac & cheese that was not vegan. They also had a rice macaroni & cheese that was not vegan. However, this new stuff is made with the aforementioned Daiya cheddar. SO AWESOME.
Back story:
I loved making my own mac & cheese, and still love it even as a vegan. I'm a fan of Road's End mac and cheese mixes. I'm also a fan of making my own mac and cheese with nutritional yeast.
Long before I was vegan, I became obsessed with this frozen mac & cheese from Michelina's. It was creamy, dreamy, quick and comforting.
Guess what? The Amy's mac and cheese tasted just like I remembered Michelina's tasted like. Amazing.
Word is that Galactic Pizza an awesome local pizza joint, is using Daiya as its vegan cheese.
Another new product I tried in the past few weeks was the Galaxy Rice Cheddar block of cheese. I've talked about my love of the rice cheddar cheese slices. It's nice to have soy-free selections in the vegan cheese market. The block of cheese shredded finely was pretty good in Tofurky sandwiches after being heated up for 30 seconds. Not nearly as good as Daiya -- like no where near. This stuff is still the most awesome vegan cheese next to Daiya, though.
So now I have more Daiya and I plan on attempting photo-worthy dishes. My main thought is to make the best potato skins ever: baked up russets with sour cream, green onions, Daiya cheese, and -- possibly -- bacooo bits. (I have a plan on making my own Bac-O Bits with some TVP. Maybe, maybe even make some killer twice-baked potatoes, we'll see.
Sunday, April 25, 2010
Afternoon Snack: Ants on a Log & Carrot Sticks
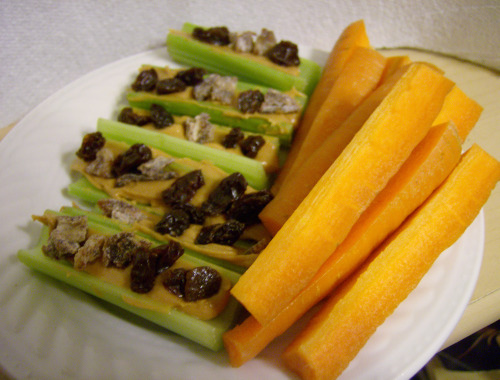
A snack blast from the past. "Ants on a Log" is a snack from many people's childhood, including mine. It involves filling celery sticks with peanut butter and covering with "ants" or raisins. To this snack I added chopped dates in addition to the classic raisins. I also had some carrot sticks. Just a simple snack, healthy and satisfying.
Chickpea Noodle Stew
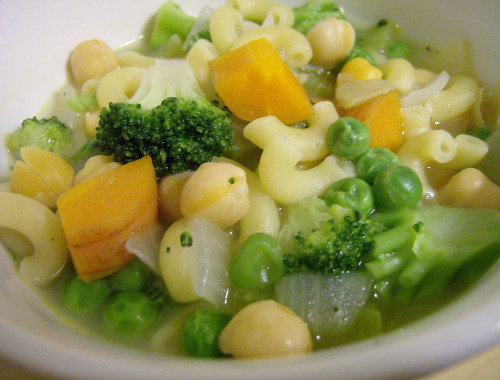
My soup/stew of the week: Chickpea Noodle Stew! Another "throw a lot of things in the pot" stew, so again, I apologize for not having a concrete recipe.
Ingredients:
diced onions, carrots & celery for mirepoix
one can of chickpeas, drained and rinsed
vegetable stock
olive oil for sauteing the mirepoix
garlic, 2-3 cloves, minced
salt, tt
elbow macaroni noodles (or any noodle at all)
vegetables (I used frozen broccoli and peas)
vegetable stock (1.5c/2c)
water
Instructions
1. Saute the mirepoix on low heat with olive oil and some salt until onions are soft and translucent. (do not brown the onions; looking for soft, maybe yellowish from oil, but not brown) This may take 5-15 minutes. I kind of wanted some texture from the carrots so I started adding other ingredients faster than I might for other soups.
2. add garlic & chickpeas
3. add vegetable stock and water
4. bring to boil, add some noodles. I just tossed in what looked like a good amount. My initial plan for this dish was something more brothy but the amount of noodles I added made it more of a stew than a soup. Still delicious, but next time I might back off the noodles a little more.
5. as noodles are nearing done time, add in some vegetables. I added chopped frozen broccoli and frozen peas. I also added more salt, but I'm a salt fiend.
6. Done! Scoop into a bowl and enjoy.
Double Decker Tacos!!!
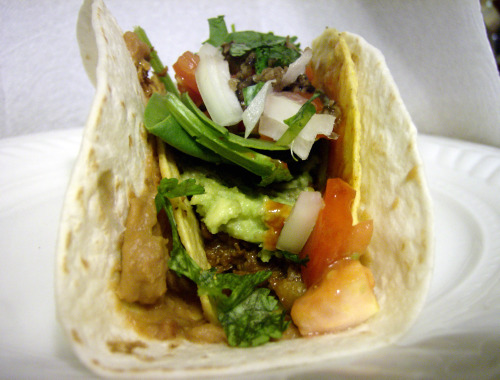
Taco Night! If you follow the Flickr-linked photo above, you'll get complete labels on the fillings.
Taco night is awesome. And last night was no exception. Refried beans makes excellent "glue" to hold a soft flour tortilla to a hard corn shell. Perfect.
It was delicious!! I believe that another taco night, or perhaps some taco pizza, will happen very soon.
Another pic:
Vegetable & Bean Stew with Spicy Biscuits
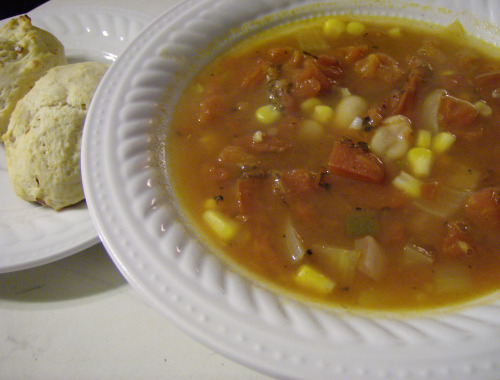
I made this quick vegetable stew the other day. I also made biscuits, a variation of the recipe from the other day. I added some liquid from the stew as well as red pepper flakes to the mix to create a spicy version. Another make it up as I go, so not an "official" recipe, but here's roughly what I did.
The Stew
Ingredients:
1 28oz can of Fire Roasted tomatoes
1 15(I think)oz can of dark red kidney beans
1 15(I think)oz can of white kidney beans (cannellini)
1 8oz can spicy Ro-Tel [diced tomatoes with habaneros)
1/2 a large onion, med. dice
2-3 cloves garlic, minced
frozen corn
cumin
paprika
chili powder
water
veg stock or bouillon cube
1tsp oil (for sauteing onion & garlic)
Instructions:
1. in stock pot, saute onion in oil until soft, add garlic and spices to taste
2. add drained and rinsed beans and can of tomatoes
3. add Ro-Tel, stir everything
4. add water. I basically filled the big tomato can with water and dumped it in and added a little more
5. bring to boil, add some frozen corn and or vegetables of choice. Sweet corn really works with these flavors but I'm sure many others would work.
6. bring down to simmer. If you feel like it, add vegetable stock or bouillon cube for flavor.
Done! The flavors of both the stew and biscuits are even better the second day. This lasted for most of the week for both me and Mr. Coconut's lunch.
Sunday, April 18, 2010
Biscuits!!
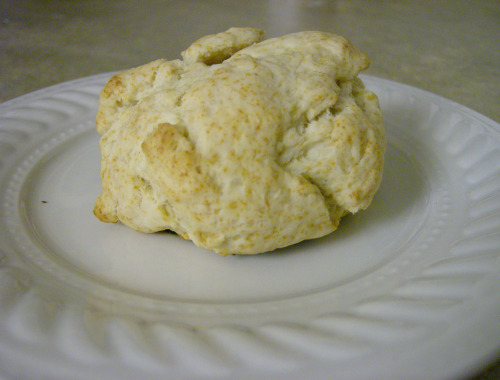
These delicious biscuits are courtesy of a recipe from Savvy Abby a blog that has tips for cheap vegan living from a VegNews Associate Editor. Great blog, I just started reading it today thanks to a heads up from a VN newsletter I get. As I was perusing the blog, I saw the recipe for the biscuits and was happy that I had all of those ingredients so I immediately got to baking.
I used olive oil and rice milk for my oil and non-dairy picks. Mainly because that's what I had available. I used regular all-purpose white flour because, again, that's what I had. Savvy Abby says that any combo of oil or flour or non-dairy liquids can be used. The basic recipe is really versatile: add sweetness for a sweet biscuit, use fresh herbs and garlic and other add-in ingredients. Go wild!
Here is a pic of a biscuit I had with Smart Balance and blackberry jam:
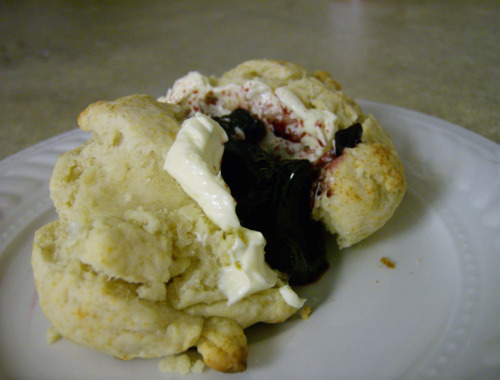
Delicious! I used the suggestion of a 1/4 measuring cup to measure out the biscuit dough for baking. I found that it created biscuits which were a little too large and had difficulty in getting some of the centers to be done all the way. They were still delicious and took 15 minutes, tops. They would be great in soups, gravies, with a sausage patty and tofu, sandwiches, etc.
Chickpea & Couscous Curry

Simple curry/stew that was quite delicious and lasted for several days. I just made it up as I went along, so I don't have exact measurements.
Ingredients:
1 28oz can of whole peeled tomatoes
same can filled with water
1c dry cous cous
half of a large onion, medium-large dice
2-3 large cloves of garlic, minced
1 can of chickpeas (15oz size?)
variety of frozen vegetables
curry powder, 1-2 Tablespoons (or to taste)
salt, to taste
olive oil, 1t
directions:
1. Dice the onion and mince the garlic. In a large-ish stockpot, saute the onion in the olive oil. Add curry powder and continue to saute until onion is soft. Add garlic and saute a little more.
2. Add tomatoes and chickpeas. I also added some frozen vegetables. I just dumped in whatever looked like it would be tasty in this dish. I had a big bag of California Blend" which had cauliflower, broccoli and carrots. I also added some frozen peas. Many vegetables, fresh or frozen, would be great. Potatoes, mixed veggies, etc. Next time, however, I am going to add the veggies later on.
3. Add water. I just used the same can of tomatoes and filled it up with water and added it to the stew. Simmer for 20 minutes or so.
4. Add couscous. I just threw it in dry and let it cook in the stew.
5. After couscous is finished cooking, the dish should be done. I enjoyed with sriracha but it was also fine on it's own.
It thickened up quite a bit the next day. I might add less couscous next time, and try not to overcook the veggies as they did this time. I personally wanted more curry flavor and some more spice to the dish. It was still delicious.
Thursday, March 4, 2010
Black Bean and Rice Tacos w. Toasted Corn Tortillas
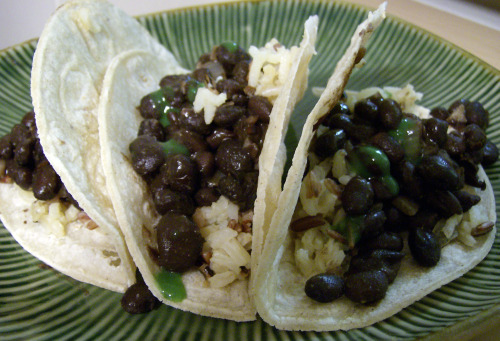
This was something I whipped up when I had very little in my pantry. These ingredients are all staples in my pantry.
The only item that isn't necessarily a staple would be the quick-cooking wild rice blend. I always have a lot of brown rice on hand, and sometimes minute white rice. This particular brand is really easy to make: I boil one small can of veg stock (about 1.75 cups, not sure on ounces) and add a little olive oil or butter. Add in one cup of the rice and drop down to a simmer for 15 minutes, then remove from heat and keep covered for another 15 minutes or so.
I seasoned up a can of drained and rinsed black beans with some standard sauteed onion and garlic and cumin as well as salt.
Sauces and condiments are a huge staple in my house, and El Yucateco green habanero sauce is a favorite of mine. According to the company's website, this particular flavor of hot sauce registers 9,000 on the Scoville Scale. For reference, according to the scale as listed in Wiki, a bell pepper rates as a "0" and a jalapeno is in the 2,500-8,000 range. This sauce is the radioactive-green looking stuff on the tacos.
Another pantry staple in my house is a stack of corn tortillas. They are pretty cheap and can be frozen so long as you fry or, in my case, toast the tortillas after defrosting. Corn tortillas fall apart pretty easily if they don't get some structural integrity from frying or toasting. I came up with toasting as an alternative to pan-frying for a healthier alternative. I remove the tortillas from the freezer and pry off 4 (or less/more) tortillas. I then microwave them in a stack until they are *just* defrosted. Then place in toaster oven until they become more sturdy. Don't toast for too long or you'll get a crispy tostada rather than a usable taco shell.
one more pic:

Fried Okra Bites w. Hot Sauce
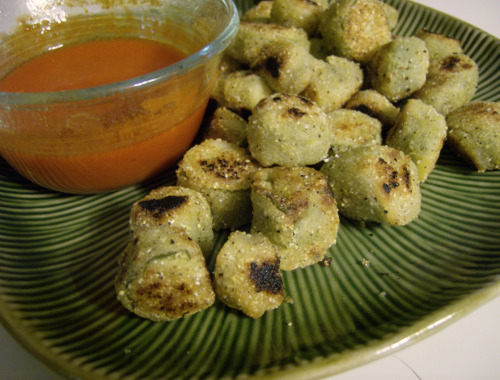
Straightforward snack: we discovered these fairly cheap frozen breaded okra bites at Super Target from a generic (not a Target-brand) brand of frozen vegetables. The instructions require them to be fried, and once I opened the package I saw why: the breading coating the okra is not cooked through and needs to be fried rather than baked. It *might* work to bake it, but I seriously doubt it.
I ended up pan-frying about half the package in vegetable oil until golden brown overall with more crispy ends. I served it with Frank's Red Hot Sauce. These are pretty delicious, though somewhat heavy due to the amount of oil the pieces hold even after pressing out as much as possible in paper towels.
Teese Vegan Cheese Review: Teese Quesadilla

So this is a quesadilla made with Teese cheese (see below for long review and thoughts on this new product). I served it on a sprouted grain tortilla and garnished with cilantro. Green Mountain Gringo was also served with it. GMG is my favorite mass-marketed shelf-stable canned salsa, second only to Salsa Lisa which is a company based right here in Saint Paul. GMG has great flavor to it, and the "hot" is actually REALLY hot. Salsa Lisa always tastes really fresh and is kept in the refrigerated section of the grocery store. Salsa Lisa also has a hot flavor I like because it is actually very hot.
The quesadilla wasn't too bad, but overall I don't really care for Teese cheese.
And now a thorough review of Teese:
Teese is a fairly new (though old news by now) vegan cheese. When it first became available to the public, it swept across the vegan food blogosphere like wildfire. It finally came to my local Whole Foods late last year, so we had to try it out.
I've made and tried my fair share of vegan cheeses. There will never be a true replacement for "real" cheese. It's been so long since I've had cheese (over 5 years) that I don't really remember it. What I look for in a vegan cheese is something vaguely reminiscent of what I do remember. I tend to favor homemade or restaurant house-made recipes over the mass-marketed cheeses. The one vegan mass-marketed cheese I like are the rice slices from Galaxy Foods. The mouthfeel mimics the over-processed Kraft singles. My thought is, if you're going to eat something that processed, why not choose the vegan version?
Okay, back to Teese. Word out in the vegan food blogosphere was that Teese melted awesomely and had a great texture, taste, etc. I tried the nacho cheese sauce, the "hard" cheddar, and the mozzarella. The sauce was weird, and I thought pretty gross overall. Of course, I'm spoiled because The Triple Rock, one of my favorite restaurants in Minneapolis for vegan eats, has mastered a vegan nacho cheese sauce which is nutritional yeast based.
I can't remember what we tried the mozz on, but I seem to vaguely recall we put it on a cheeseless pizza from Papa John's or something. It was adequate.
So last, but not least, I made a quesadilla with the cheddar Teese and a sprouted grain tortilla. I placed the tortilla in a warm pan sprayed with some non-stick oil. I shredded a lot of the Teese and placed it on one half of the tortilla and folded the tortilla in half. I cooked it by placing a weight (like a heavy lid) on top of the tortilla itself. I also flipped the whole thing at least once. The Teese got melty, that's for sure. However, it did not stay that way for long.
[I expected this as the thing that makes cheese melty is a milk-derived protein called Casein. A lot of "non-dairy" and "lactose-free" cheese contains this protein and makes it not vegan.]
Unlike the other main mass-marketed cheese available, Follow Your Heart(aka Vegan Gourmet), the Teese solidified into a more plastic texture. It was not very appealing. I also felt that the Teese did not stay in it's melted state for very long, at least it was a much shorter time than FYH. The texture & overall mouthfeel in Teese's melted state was pretty good, and I would say even better than FYH. Teese is interesting because it didn't disintegrate and morph into a pool of oil if heated too much, which is a major downside of FYH. Again, I couldn't get over how...plastic...it was. When bits of cheese fell out of the tortilla and onto the hot pan, it never turned to oil, it just became crispy and strangely plastic-like.
Overall, it wasn't too bad. I don't think I will be dropping that much money (something like $6-9 USD per what I believe are 10oz tubes). Those tubes are also a great disappointment compared to the resealable package offered by FYH. I'll stick to homemade stuff and my occasional indulgence of the rice-based single slices.
White Bean and Potato Soup with Crispy Garlic Rounds

I found this in random folder and saw it had not been uploaded. I vaguely remember making this, but it was a long time ago. I'm pretty sure it started with onions, garlic, salt and some other seasonings. White Cannellini Beans, canned, were drained, rinsed, and added. Then some water, possibly veg. stock. Then sliced potatoes, I'm guessing gold russets. Cooked until tender and mashed/blended until at a consistency I liked. I don't have a large blender nor do I have a stick blender (though it's on my wish list) so it's not really possible for me to puree. That's okay as I tend to like most of my soups to be a bit thick and hearty.
I garnished with fresh Thyme and served with some crispy garlic rounds.
VWAV: Curried Split Pea Soup 2, served with roasted vegetables and melba toast
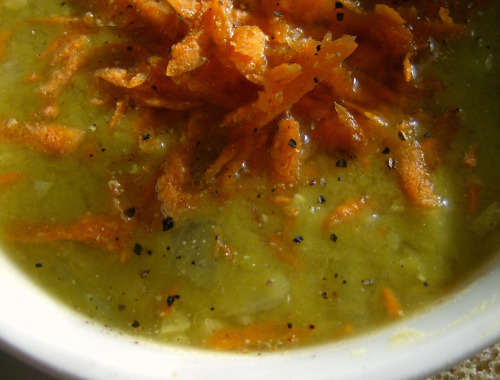
I've made this before, and it is the only thing I've made from Vegan With a Vengeance the popular vegan cookbook that is ubiquitous in the vegan food blogosphere and beyond. I actually may have made a few other recipes, but this is the only one I always have the ingredients for by default and it is SO EASY to make, I keep going back to it.
This time around, I served it with roasted vegetables that I tossed and marinated in olive oil and balsamic vinegar. The vegetables I used: red, yellow, and green bell peppers; zucchini and yellow squash. I cut all the veggies into as Placed on cookie sheet and roasted in oven until tender then placed under broiler to get some of that charred roasted flavor.
I garnished the soup with shredded carrot, which is how it is recommended to serve in the cookbook. I highly recommend this because it gives a great added texture and flavor layer to the soup. I also served with pieces of melba toast, which I am always in love with because they are miniature in size and adorable.
A second photo, this time of the whole plate. (I LOVE the lighting I was able to get for this photo. I've found it is still hard for me to get decent lighting for most of my photos, but I'm working on a makeshift lightbox for the future.)

Wednesday, March 3, 2010
The Great Cake Waffles Experiment: Chocolate and Vanilla

I love making cake, but the problem I have with making most desserts is that I don't typically have tons of people to share the dessert with. So when I make a large number of cupcakes, cookies, or just a big cake, Mr. Coconut and I end up gorging on all of it within 2 days or some of the dessert goes bad.
My solution came in the form of my waffle iron. Genius, pure genius.
I've seen/read/heard of other folks using waffle irons for cooking things other than waffles. I also know I am not the first person to think of cake batter in a waffle iron, but nonetheless it was a delicious experience.
I used Cherrybrook Kitchen brand cake mix in vanilla and also chocolate. Cherrybrook Kitchen is an awesome brand of cake, cookie, and other baking mixes that are allergen free, which makes all of their products vegan. They also have a decent line of gluten-free mixes. These are available at Whole Foods, Super Target, and local co-ops in my area.
It took a while to get the timing and amount just right. I used my Belgian waffle iron, which made for some extremely delicate pieces that fell apart easily. A regular waffle iron with smaller squares or pockets, whatever you want to call it, would probably be better for a more sturdy piece of cake. I sprayed the waffle iron with non-stick spray, ladled in what I figured out to be the perfect amount, closed the waffle iron and waited. My iron has a self-timer with a green light that indicates when you should pour in the batter and a red light which indicates when it is done. I found I had to wait for a minute or two after the red light came on in order to get the cake in one piece.
All in all, light, fluffy cake was done within minutes. I was able to store the pieces in the fridge in an airtight container for a lot longer (and a lot easier) than a whole cake. I used some frosting from Pillsbury that is "accidentally" vegan and decorated with sprinkles. I couldn't frost easily because I was too impatient to soften up the frosting enough to spread on the delicate pieces -- so no photo of the frosted end result.
Here's a shot of the vanilla pieces in the waffle iron:

